
Connections for Developers
This doc shows you how to connect different development tools to Guru's MCP Server.
Cursor IDE
- In Settings → Cursor Settings → Tools & MCP, click “New MCP Server”
- Add Guru's MCP to the
mcp.jsonfile and save the file and close it
{
  "mcpServers": {
    "Guru": {
      "url": "https://mcp.api.getguru.com/mcp"
    }
  }
}- Under Installed MCP Servers, click "Connect" next to the Guru MCP you just installed
- Grant permissions for Cursor to access Guru via MCP
Claude Code
- After installing Claude Code, open a terminal window to interact with Claude CLI
- Run
claude mcp add --transport http guru https://mcp.api.getguru.com/mcpto install Guru's MCP server - Run
claude mcp listto view all installed MCP servers and make sure Guru MCP is included. You'll see that the MCP server still needs authentication - To authenticate, open Claude Code by executing
claude - Once you're in Claude Code, type
/mcpto manage your MCP servers. Navigate the the one you just created for Guru and click Enter - Choose Authenticate. This will open a browser window where you'll be prompted to accept the necessary permissions.
OpenAI Agent Builder
- Open your agent in Agent Builder and click the + next to Tools, then choose MCP Server.
- Alternatively, open your MCP node and click + Add
- Click + Server at the top right to add a new MCP server.
- In your terminal, base64 encode your Guru email address and API token. Do not include the curly brackets. The output here will be used in step 4.
echo -n "{email}:{api_token}" | base64-
Fill out the following fields:
- URL:
https://mcp.api.getguru.com/mcp - Label:
guru_mcp_server - Description: Guru MCP Server
- Authentication: Custom headers
- header:
Authorization - value:
Basic {output_from_step_3}
- header:

- URL:
- Click Connect - this will establish the connection to Guru's MCP server
- Select the Guru tools you'd like your agent to have access to
- Click Add
n8n
Configure Credential
- From the "Overview" page, click "Credentials", then Create credential
- Select MCP OAuth2 API then click "Continue"
- Ensure "Use Dynamic Client Registration" is set to true, then enter
https://mcp.api.getguru.com/mcpas the Server URL - Click "Connect my account" - this will bring up an authorization screen in Guru where you'll need to accept permissions.
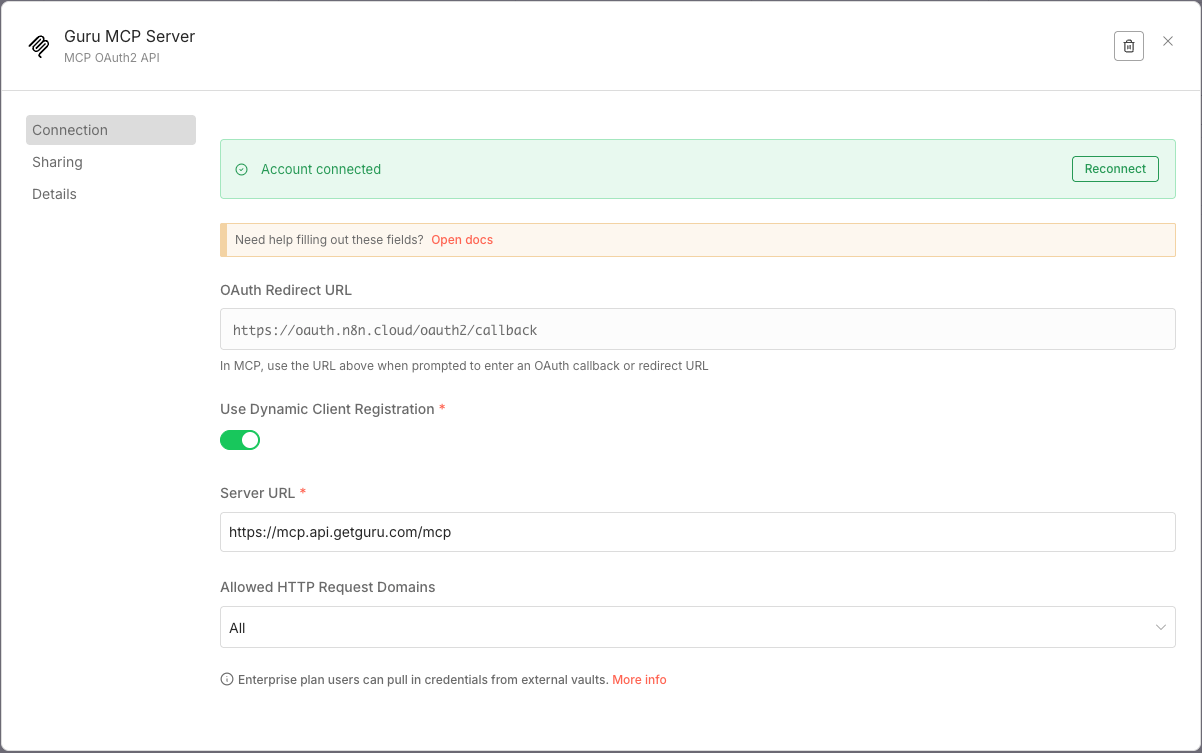
Note: You may receive the following error during Step 4:
Authentication failed: The 'scope' parameter is invalid, the supported scope is 'default'. This is due to an intermittent bug with n8n. If you encounter this error, simply copy the URL from the authentication screen, open a new tab and paste it in. At the end of the URL, changescope=openidtoscope=default, and hit enter. This should bypass the error and bring you to the correct screen where you'll accept permissions.
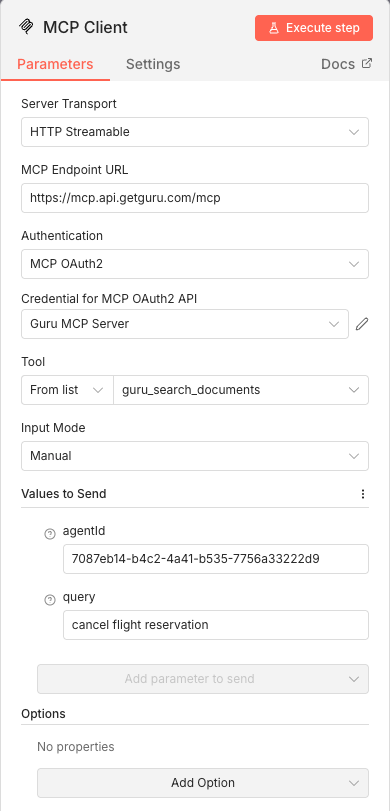
Configure MCP Client Node
- Now you are ready to use Guru's MCP server in your n8n workflow. Choose the MCP Client node and enter
https://mcp.api.getguru.com/mcpas the MCP Endpoint URL. - Select MCP OAuth2 from the "Authentication" dropdown
- Select the credential you just created for the "Credential for MCP OAuth2 API" option.
- You can then select the tool you'd like to use in your workflow. Some tools require an
agentIdto be passed in. You can find theagentIdin Guru on the API tab of the Knowledge Agent you'd like to use.
Custom MCP Client
If you’re building your own MCP-compatible app:
- Use the MCP client SDK in your language of choice
- Configure Guru’s endpoint:
https://mcp.api.getguru.com/mcp - Provide your credentials (OAuth or token)
- The SDK handles all protocol communication automatically
Updated 7 months ago