Custom Sources for Answers
This guide shows you how to set up a Custom Source in Guru and load records via Zapier.
Create the Custom Source
To create a custom Source in Guru, you will need to make the following API call:
POST https://api.getguru.com/api/v1/sourcesRequest Body:
{
  "type": "CUSTOM",
  "config":
    {
        "name": "Source_Name_Goes_Here",
      	"type": "CUSTOM"
    },
  "definition":
  	{
    		"type": "CUSTOM"
  	}
}
You will be given a response that looks like the example below. The id from the response is the ID of the Custom Source - you will need this field later in this process.
{
    "id": "xxxxxxxx-xxxx-xxxx-xxxx-xxxxxxxxxxxx",
    "type": "CUSTOM",
    "config": {
        "name": "Source_Name"
    },
    "createdBy": {
        "id": "xxxxxxxx-xxxx-xxxx-xxxx-xxxxxxxxxxxx",
        "status": "ACTIVE",
        "email": "[email protected]",
        "lastName": "Duffy Demo",
        "firstName": "Joe"
    }
}
Records
Now that you've created the source, you'll need to load records to the source. These are the records that are used to formulate an AI-generated answer when a user asks a question in Guru.
There are a couple of options when it comes to loading records to sources:
- Directly via the API
- Through an iPaaS solution, such as Zapier. You'll still need to be familiar with the API if you plan to load records using an iPaaS solution.
Load Records Directly via the API
Loading records to a custom source through the API is fairly straightforward. You'll want to get the Source ID from the API call you made above to create the source - that will be used in the API URL for this next call. There are a few key elements that you need for each record you load to a Source:
externalId: this is the ID of the record you're loading to the source. It is used to check our system to see if that record already exists. If it does exist, we will update the record. If it does not exist, we will create a new record.title: this is the title of the record you're loading to the source. It will be used as a display in the Guru UI when Answers is citing the source/record it used to formulate an answer.url: this is the title of the record you're loading to the source. It will be used as a hyperlink for users to click on when they want to look at the source of the answer Guru has provided in the UI. This needs to be a valid URL.content: this is the actual content of the record you're loading to the source. It needs to be sent in plain text format, which means removing HTML tags, emojis, etc.
Note: this endpoint will create a record if the externalId is not found in our system. It will also update an existing record if the externalId is found in our system
PUT https://api.getguru.com/api/v1/sources/{sourceId}/records/{externalId}Request Body:
{
  "externalId": "airtable_rec3lbPRG4aVqkeOQ",
  "title": "Record Title",
  "url": "https://airtable.com/app4UojDvMJ841ltD/tbleUfsyAmXerB7hv/rec3lbPRG4aVqkeOQ",
  "content": "Here is some record content in plain text."
}
Load Records via Zapier
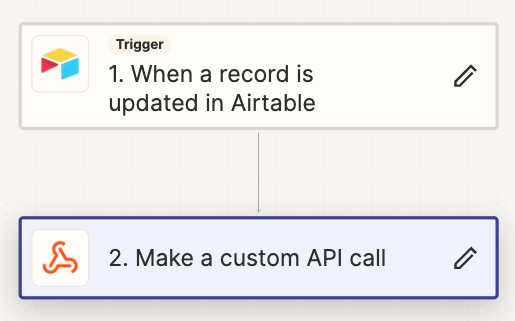
As with any Zapier automation, you'll need to start with a trigger. This could be something like "new or updated record in Airtable" or "row is updated in a Google Sheet". Although the possibilities are endless, for this example we'll add/update a record to our newly created Guru Source anytime a record is added to or updated on an Airtable table.
Here are the two steps you'll need to use to get this working:

Configure your trigger in step 1 to fit your specific needs. Choose the appropriate base, table and the timestamp field the automation should key off of.
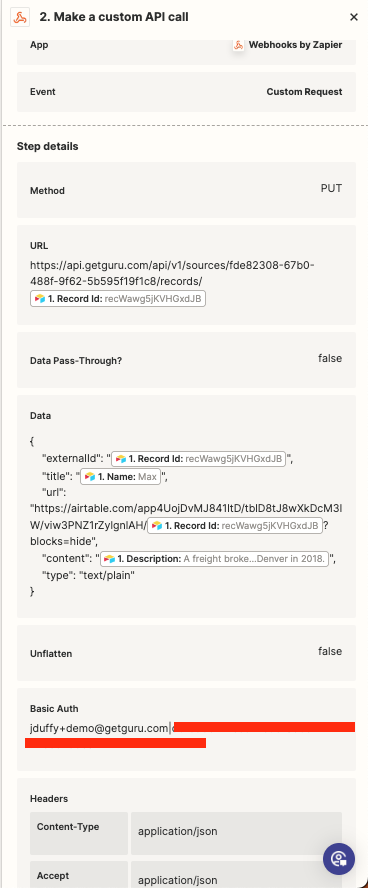
In step 2, you'll need to make the API call outlined above to load the Airtable record into your Source. Below is a screenshot of the configuration.
Note: in the "Basic Auth" field, you'll need to include your Guru email address, a pipe delimiter, then your Guru API token. (ex. [email protected]|xxxxxxxx-xxxx-xxxx-xxxx-xxxxxxxxxxxx)

Read me!The data passed in the "content" field needs to be in plain text. Depending on the type of data you are trying to pass into your Guru Source, you may need to do some sort of data transformation prior to making the PUT call. You can do this by injecting a "Formatter by Zapier" action into the automation. This can take care of things like HTML tags, quotes, carriage returns, tabs, emojis, etc.
Upload an Icon to Your Custom Source
This endpoint allows you to upload an icon for your custom source using a multipart/form-data request.
NoteThere is no JSON request body for this endpoint. The file is uploaded directly as part of the
multipart/form-datapayload.
POST https://api.getguru.com/api/v1/sources/{sourceId}/config/iconUrlReplace {sourceId} with the ID of your custom source.
Request Headers
- Authorization: Your API key or Basic Auth credentials
- Content-Type:
multipart/form-data - Accept:
application/json
Request Parameters
- iconImage (required): The image file you want to upload. This should be included in the
multipart/form-dataas afilefield.
Example Request Using curl
curlcurl -X POST "https://api.getguru.com/api/v1/sources/fde82308-67b0-488f-9f62-5b595f19f1c8/config/iconUrl" \
-H "Authorization: Basic sadfuoasdh....gure9w732" \
-H "Accept: application/json" \
-F "iconImage=@/path/to/your/icon.png"
Replace /path/to/your/icon.png with the file path to your icon. Notes
- No JSON Request Body: This endpoint uses multipart/form-data, so there is no JSON body. The file is uploaded directly in the request payload.
- Supported Formats: Ensure the uploaded file is in a supported format, such as .png or .jpg.
Authentication: Use your API key or Basic Auth credentials in the Authorization header. a 1:1 ratio is rendered best - we recommend 200x200. - Response: On success, the API returns the updated configuration with the new iconUrl.
Other Helpful Source API Endpoints
| Description | Method | Endpoint |
|---|---|---|
| Retrieve a list of sources | GET | /api/v1/sources |
| Retrieve a source | GET | /api/v1/sources/{sourceId}?fieldDetail=FULL |
| Delete a source | DELETE | /api/v1/sources/{sourceId} |
| Get a source record | GET | /api/v1/sources/{sourceId}/records/{externalId} |
| Create OR Update a source record | PUT | /api/v1/sources/{sourceId}/records/{externalId} |
| Delete a source record | DELETE | /api/v1/sources/{sourceId}/records/{externalId} |
Updated 4 months ago
